Most of them are outdated, but provide historical design context.
They are not user documentation and should not be treated as such.
Documentation is available here.
Trusted Compute Pools
Summary
Trusted Compute Pools provide a way for Administrator to deploy VMs on trusted hosts.
Owner
- Name: Gang Wei (gwei3)
- Email: gang.wei@intel.com
Current status
- Status: Merged
- Engine change: http://gerrit.ovirt.org/#/c/14605/
- Webadmin change: http://gerrit.ovirt.org/#/c/14611/
- REST api change: http://gerrit.ovirt.org/#/c/14692/
- OVF change: http://gerrit.ovirt.org/#/c/14729/
- left-overs for notification and some corner case handling
- Last updated date: Sept 16, 2013
Detailed Description
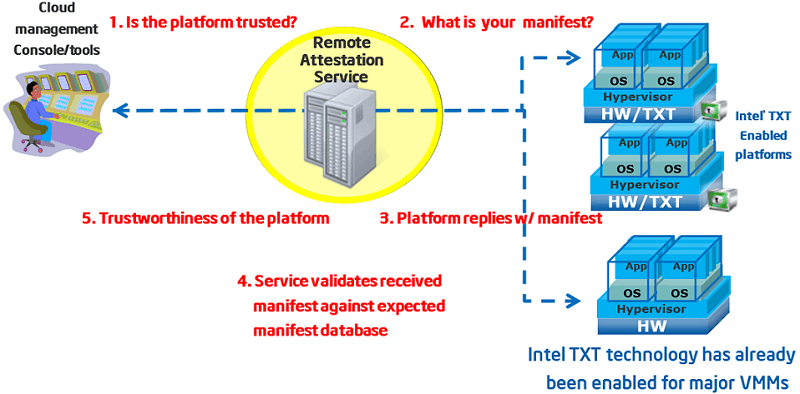
The feature will allow data center administrator to build trusted computing pools based on H/W-based security features, such as Intel Trusted Execution Technology (TXT). Combining attestation done by a separate entity (i.e. “remote attestation”), the administrator can ensure that verified measurement of software be running in hosts, thus they can establish the foundation for the secure enterprise stack. Such remote attestation services can be developed by using SDK provided by OpenAttestation project.
Remote Attestation server performs host verification through following steps:
-
Hosts boot with Intel TXT technology enabled
-
The hosts’ BIOS, hypervisor and OS are measured
-
These measured data is sent to Attestation server when challenged by attestation server
-
Attestation server verifies those measurements against good/known database to determine hosts’ trustworthiness
 By far, we got following implementation approach for TCP feature:
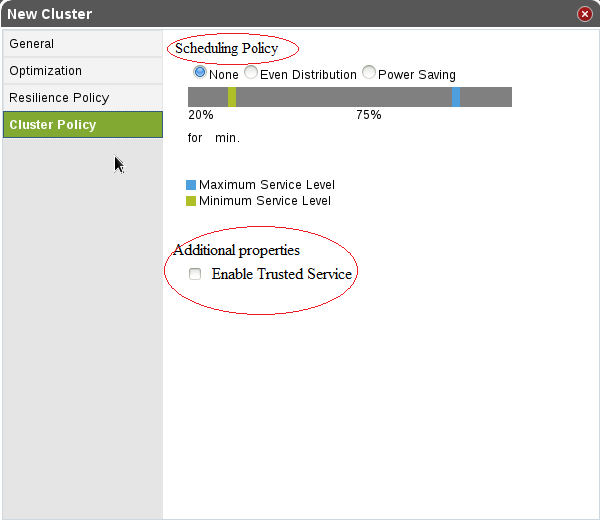
- Approach: trust property in cluster level policy. The biggest benefits are VM migration can work without specific changes, and no performance impact for VM creation.
Frontend changes
Divide cluster policy side tab into two sections, “scheduling policy” and “additional properties”. “Enable Trusted Service” checkbox must be selected to create a trusted cluster.
Backend changes
- Add attestation check logic in “InitVdsOnUpCommand.java” to initialize status of each host before active, this java file can be found in this path org.ovirt.engine.core.bll.
- The first time when this host add into a trust cluster, call attestation server to determine the real status (untrusted , trusted) of the VDS (physical host), the host will be in “up” status if get “trusted” result from attestation server, or else, set this host as non-operational status.
- When host is down for a different reason and up again, attestation check logic will be triggered also.
- Call
SetNonOperationalVdsCommandwith a newNonOperationalReason. This command will try to migrate all VMs from the host and then set it non-operational. In the case of another trusted host existed in trust cluster, all of the VMs will try to migrate to that trusted host. For the non-migrational VMs, keep these VMs running.
- Activate a trusted host by admin {optional}
Admin can activate an untrusted host manually after getting a positive response from attestation server manually. This is optional as host’s status changes only under the conditional of reboot, host’s reboot and invoke InitVdsOnUpCommand will call attestation server again.
In the UI there is an “Activate” option. What still needs to be added is the checking with the attestation server to make sure that whether this host is trusted and this cluster is defined as ‘Trusted’. If so, only trusted host will succeed in the activate command (a proper Audit Log error in case the host failed to activate due to trust issue.) Check logic will be added in VdsManager:activate ().
Code path is “ovirt-engine/backend/manager/modules/vdsbroker/src/main/java/org/ovirt/engine/core/vdsbroker/” where the re-activation process begins.
OVF related changes
When the VM created in the trusted cluster was exported as OVF file, OVF file should have a new flag to indicate this VM should be running in a trusted cluster. Key relevant classes include OvfTemplateReader.java, OvfTemplateWriter.java, OvfVmReader.java and OvfVmWriter.java. We define this new property in export file as “trusted_service”. When importing a ‘trusted’ VM into an untrusted cluster, two cases should be considered.
- The admin is doing a mistake and chooses the wrong cluster, alert information will be triggered.
- The admin has a real case where he wants the VM to run in an ‘untrusted’ cluster.
Restful API
Create a trusted cluster via restful API, curl command may like this.
    curl -v -u "admin@internal:abc123" \
      -H "Content-type: application/xml" \
      -d '<cluster><name>my_trust_cluster</name><data_center><name>"Default"</name></data_center> <version minor="2" major="3"/> <cpu id="Intel SandyBridge Family"/><trusted_service>true</trusted_service></cluster>' \
      'http://engine.***.com:80/api/clusters'
Key relevant modification includes api.xsd and ClusterMapper.java.
Database change
Trust cluster need a new property named as “trusted_service” to indicate this is a trusted cluster. Relevant tables / views include vds_groups, vm_templates_view and vms.
High Availability
Not to implement in the first version.
Benefit to oVirt
This is a new feature, it will bring higher security level for data center managed with oVirt.
Dependencies / Related Features
None.
Documentation / External references
Test cases
Create a trusted cluster
- go to the Clusters tab
- click on the New button
- set cluster Name
- select Enable Virt Service checkbox
- select Enable Trusted Service checkbox
- click ok
- if user has not configured the attestation server, check whether to give the user a notification
- make sure configure correctly it, then click ok
Add a trusted host
Dependens on Create a trusted cluster
- go to the Hosts tab
- click on New button
- set host Name and Address, and make sure the host is trusted attested by attestation server
- select a trusted cluster as a cluster
- click ok
Add an untrusted host
Dependens on Create a trusted cluster
- open the Hosts tab
- click on New button
- set host Name and Address, and make sure the host is untrusted attested by attestation server
- select a trusted cluster as a cluster
- click ok
Reboot the trusted host
Dependens on Create a trusted cluster , and Add a trusted host
- go to the Hosts tab
- reboot the host in the trusted cluster(s) manually
- after the host start, right click Confirm ‘Host has been rebooted’
- check whether the host is Up status
Reboot the untrusted host
Dependens on Create a trusted cluster , and Add an untrusted host
- go to the “Hosts” tab
- reboot the host in the untrusted cluster(s) manually
- after the host start, right click Confirm ‘Host has been rebooted’
- check whether the host is Nonoperational status
Reboot engine
Dependens on #Create a trusted cluster , Add a trusted host, and Add an untrusted host
- make sure there are at least two hosts in the trusted cluster(s), and one is trusted and the other is untrusted
- restart the engine service
- back to the ’ Hosts’ tab, and check the hosts’ status.
- the trusted host(s) status change from Nonoperational to Up; the untrusted host(s) is always Nonoperational
Create a truster cluster via restful API
- Exec command:
curl -v -u "admin@internal:abc123" \ -H "Content-type: application/xml" \ -d '<cluster><name>my_trust_cluster</name><data_center><name>"Default"</name></data_center><version minor="2" major="3"/> <cpu id="Intel SandyBridge Family"/><trusted_service>true</trusted_service></cluster>' \ 'http://engine.\*\*\*.com:80/api/clusters' - go to the Clusters tab
- choose the trusted cluster that has just been created , and here is my_trust_cluster
- click Edit button
- check if Enable Trusted Service is checked
Create a trusted VM
Dependens on Create a trusted cluster , and Add a trusted host
- go to Virtual Machines tab
- click on New button
- choose a trusted cluster as a cluster, here you need make sure the trusted host is Up status
- click ok
Export a VM
- open Virtual Machines tab
- right click the trusted host and choose Export
- go to Storage tab, import a new trusted VM
Export template
- Open Template tab, choose the template and click Export
- Open Storage tab, import a new template
Run the exported VM
- open Virtual Machines tab, choose the exported VM
- right click the VM and run this VM