Most of them are outdated, but provide historical design context.
They are not user documentation and should not be treated as such.
Documentation is available here.
virt-v2v Integration
Extended import of Virtual Machines
Summary
This feature extends the existing Import VM functionality in oVirt to support import of virtual machines from additional types of sources to oVirt.
Owner
- Name: Arik Hadas (Arik)
- Email: ahadas@redhat.com
- Name: Shahar Havivi (Shaharh)
- Email: shavivi@redhat.com
Current status
- VMWare via Libvirt: merged to upstream and 3.6
- VMWare via OVA: merged to upstream and 3.6
- Xen on RHEL: merged on upstream pending for 4.0
- Kvm via Libvirt : currently in development
- Last updated on – by (WIKI)
Detailed Description
Currently only virtual machines which exist on oVirt’s Storage Domain (either export domain or data domain) can be imported. It means that only three kinds of virtual machines can be imported to oVirt:
- Virtual machines which reside on Storage Domain that was attached to the Data Center
- Virtual machines that were exported from oVirt and now reside on the export domain
- Virtual machines that were converted from external environment to the export domain as a preliminary step
This feature aims to introduce a general process in oVirt for import virtual machines. Import VM from Storage Domain will be just one use-case of the general process. Other use cases will now be supported:
- Import VM from VMware ESXi/VSPHERE: The user specify URL+authentication to the host wher ESXi/VSPHERE runs on
- Import KVM/Xen VM from Libvirt: The user specify URL+authentication to the host where Libvirt runs on
- Import KVM/Xen VM from a given path: The user specify nfs/posix path to the VM configuration & disks
- Import VM which was exported from VMware: The user specify nfs/posix path to ova file
- Upload KVM/Xen VM: The user specify files of the configuration and the disks
- Upload VM which was exported from VMware: The user specify ova file
- Import VM from folder: The user specify path to folder that contains KVM/Xen VMs or VM exported from VMware
- TBD: Physical Machines (p2v)
Note: the way uploaded files will be sent - TBD
The implementation of the ‘Other use cases’ mentioned above will be based on virt-v2v[1]. virt-v2v is a versatile tool for converting virtual machines which oVirt users currently use independently to convert virtual machines from external environments to export domain. Integrating virt-v2v in oVirt will improve the import process for those use-cases:
- We will not need to go though the export domain as an intermediate step. It will reduce the number of times the disks are copied (which might be a long task) and will reduce the number of operations the user needs to do in order to get the VM in his oVirt-managed Data Center
- The users will be able to specify the conversion properties in a easier way using the webadmin
- The conversion progress will be reported in the webadmin
General Import Process
The general process for import VM from the sources mentioned before should be:
-
Set the source from which the VM should be imported
-
Select destination storage domain
-
Select proxy host (see Proxy Hosts section below)
-
Select VM from the source
-
Get VM configuration
-
Set conversion properties
-
Add (updated) VM & disks to the DB (locked)
-
Convert the disks
-
Update VM & disks if necessary (update actual disks size for example)
-
Unlock VM & disks
- The disks conversion progress should be monitored
- Support for copying different disks to different storage domain will be considered later
Import from Export Domain
The current import VM from export domain operation in terms of the general flow:
-
Set the export domain the VM resides in
-
Select destination data domain
-
No need to select proxy host (TBD: convert the monitoring of the import to be non-SPM tasks?)
-
Selects one of the VMs which are in the export domain
-
The VM configuration already exists (we already got OVFs from the export domain)
-
Set the conversion properties (TBD: more stuff other than clone?)
-
VM & disks are added to the DB (locked)
-
Disks are copied
-
No other update is required
-
Unlock VM & disks
Import from Libvirt/VMware
Import from external environments using virt-v2v in terms of the general flow:
-
Set the properties of the external environment manually or by selecting a provider
-
Select the destination data domain
-
Select host in the Data Center that has virt-v2v installed to serve as proxy
-
Select VM that resides in the external environment
-
Do a conversion that does not include disks in order to get the VM configuration
-
Set the conversion properties
-
The modified VM & disks are added to the DB (locked)
-
Do a conversion that includes disks
-
The size of the disks will be updated
-
Unlock VM & disks
Importing OVA Files from VMware
You can import an OVA file from a live VMware data center host. Before proceeding, make sure that:
-
The OVA file is stored in TAR format.
-
The source host has enough space to allow you to extract the OVA file to the host’s temporary directory.
The following procedure uses ‘rhel’ as an example:
-
Export a rhel virtual machine from VMware to /tmp/rhel.ova in the VDSM host (For example, HOST1).
-
Change the permission for /tmp/rhel.ova to qemu:kvm (36:36).
-
Go to the oVirt Administrator Portal and click the Virtual Machines tab.
-
Click Import from the top menu to open the Import Virtual Machine(s) dialog box.
-
In the Source drop-down menu, select VMware Virtual Appliance (OVA).
-
In the Host box, select HOST1 (The same host that you exported from VMware).
-
In the Path box, enter /tmp/rhel.ova.
-
Click the Load button to add the rhel virtual machine to the Virtual Machines on Source box.
-
Select rhel and click the top arrow to move rhel into the Virtual Machines to Import box.
-
Click Next in the bottom right corner.
-
Now you can adjust other virtual machine attributes such as Name, NIC, etc.
-
Click OK in the bottom right corner to begin importing the virtual machine.
Note: Currently, oVirt can only import OVA files from a VMware host. KVM and Xen are not supported at this time.
Import Uploaded VM or VM from path
Import specified VM in terms of the general flow:
-
Set the path to the VM or upload the files
-
Select the destination data domain
-
Select host in the Data Center to server as a proxy, the files will be copied (for upload) or mounted to it
-
No need to select VM
-
Do a conversion that does not include disks in order to get the VM configuration
-
Set the conversion properties
-
The modified VM & disks are added to the DB (locked)
-
Do a conversion that includes disks
-
The size of the disks will be updated
-
Unlock VM & disks
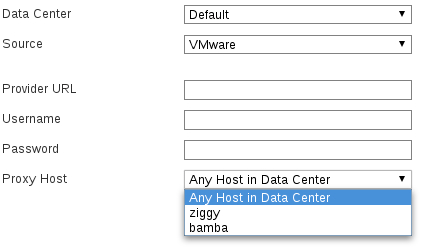
Proxy Hosts
In a common case, oVirt will reside in a different network than the one the external system, which contains the VMs that going to be imported, resides. One or more hosts in oVirt will be connected to the network of the external system for the imprort operation, so we will need to make sure the user can select those hosts as proxies for the import process.
During the configuration of import operation from external system (i.e not Storage Domain), the user will have to select a proxy host. Only host which resides in the destination Data Center and has virt-v2v installed can serve as a proxy. The request from the engine will be executed by this host.
The following diagram demonstrates the described architecture: 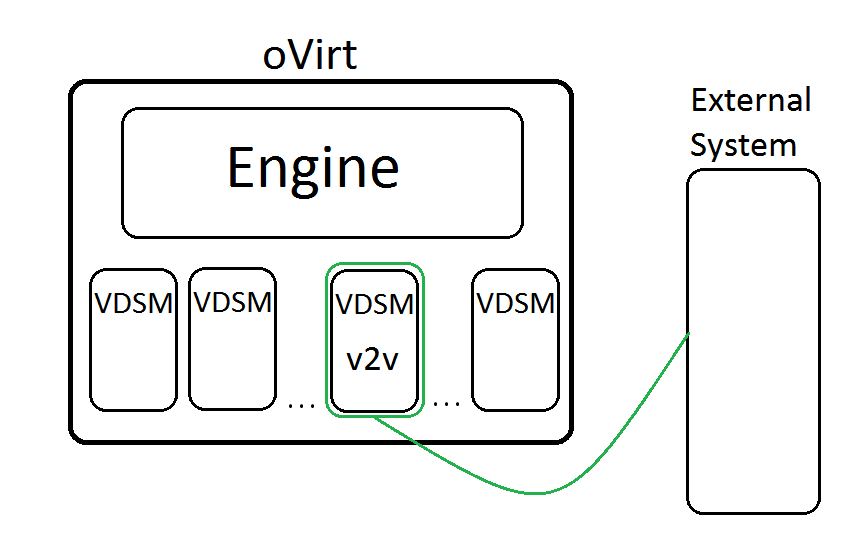
External VM Providers
To ease the import configuration, users will be able to define the external environment which manages the VMs that are about to be imported as External Provider of VMs. In general, external provider definition contains the URL of the management application in the external environment and authentication properties. There might be additional environment-specific properties as well.
In the import configuration, users can select such an already defined provider as a source for the import operation.
Benefit to oVirt
This feature will make it easier to migrate virtual machines from different environments to oVirt:
- Making it more managed - as the process will be executed and monitored by oVirt
- Making it easier to define - expose the relevant parameters in the UI
- Making it less error-prone - less configuration to set
Design
Backend
- Add queries for listing VMs from the different sources
- Add queries for getting VM configuration from the different sources
- Generalize the import VM command for the general case (including changing the monitoring to similar to the mechanism used for live-merge)
- Add external VM providers
VDSM
- Add verb that lists VMs in external environment (running Libvirt or ESXi/VSphere using virsh)
- Add verb for getting VM configuration from external environment (using virt-v2v with ‘no-copy’)
- Add verb for converting the disks and get full VM configuration from external environment (using virt-v2v)
- Report the progress of the convertions above using the mechanism that is used for live-merge
UI
- Add import button to the Virtual Machines main tab
- Add dialog which lets the user configure the properties for the import operation as described above
- Add dialog which lets the user configure the conversion properties (i.e map networks, change name)
- Fetch the VM configuration if it is not already fetched for listing the VMs, using a different query
- Add dialog for defining external VM provider
Database
No need for changes in the DB
UI Screenshots
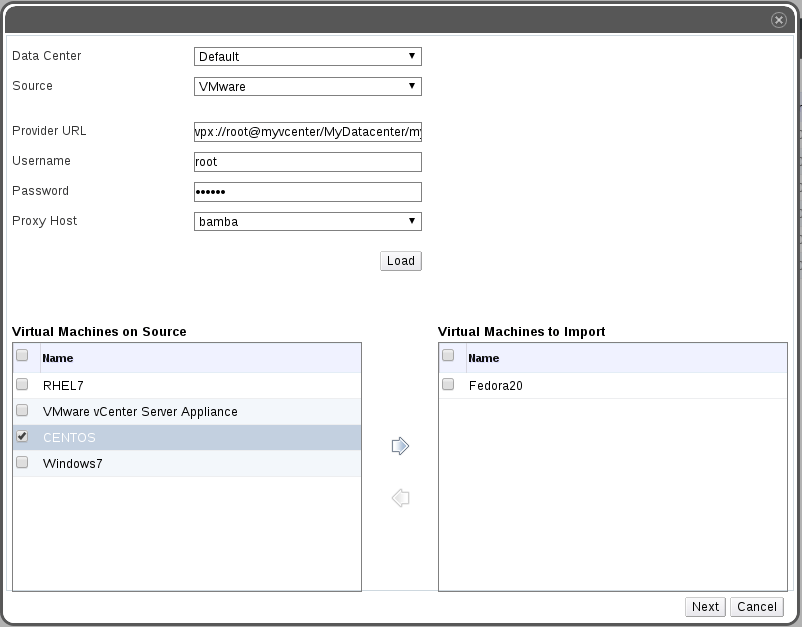
First, given a URI and credentials for connecting to the external system, a list of virtual machines that exist in the external system is presented. The user can then select a subset of these VMs to import.
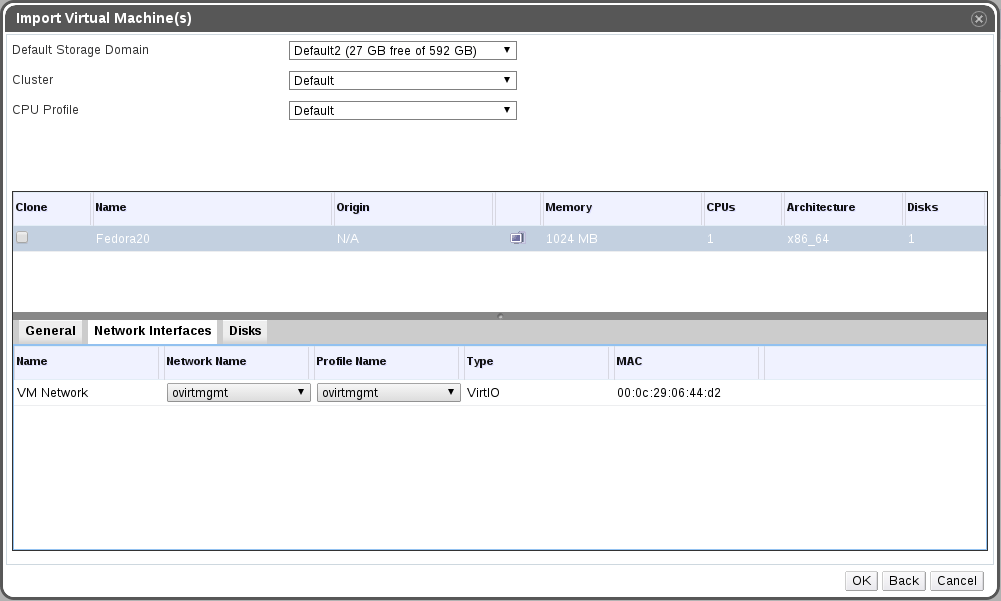
The next dialog shows a list of the selected VMs from the previous dialog with general settings such as default storage-domain and CPU profile along with a configuration per-VM (this dialog is similar to the one which is used when importing from an export-domain).
In the screenshot above the tab of network interfaces is shown. It was extended such that user can map networks from external system to networks in oVirt. TBD: editing of mac-addresses
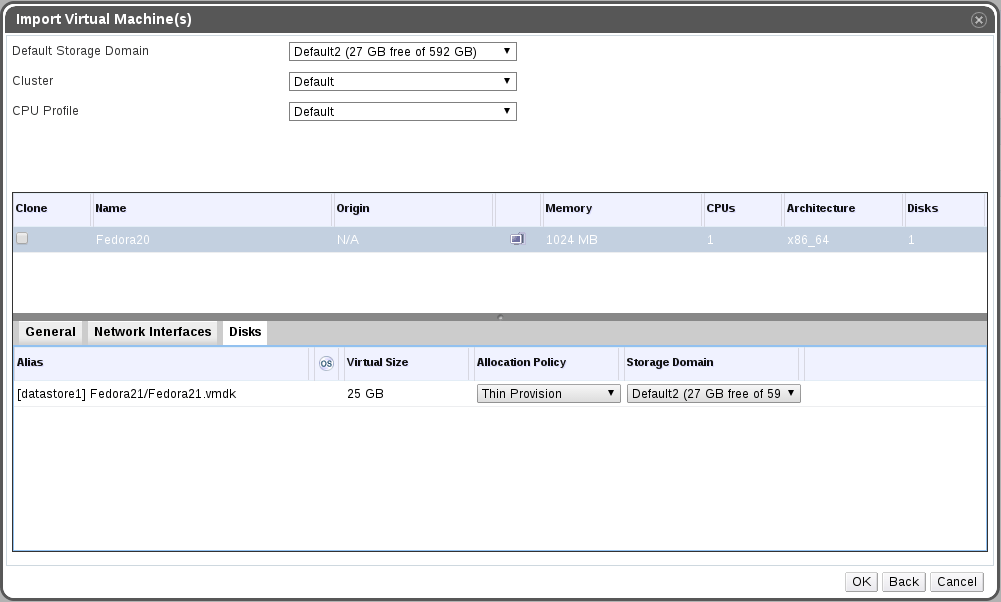
This screenshot shows the sub-tab for disks. The alias is the full-names of disks in the external system (including the name of the storage).
Notes:
- We might disable the option to set different target storage domain to different disks.
- TBD: Changing the name of the VM in case a VM with the same name already exists in oVirt directly from this dialog instead of having the clone-VM dialogs
- TBD: allow the user to specify the operating system and use it instead of getting it from virt-v2v
Dependencies / Related Features
Documentation / External references
[1] virt-v2v
[2] virt-v2v virt-v2v’s Documentation
[3] KVM Forum 2015
[5] Demonstration of import of Windows guest from vSphere to oVirt
Testing
TBD